Overview
This knowledge base article provides step-by-step instructions on how to setup Kiosk with CIS 3.0.0 L1 + BL.
Excluded settings from CIS 3.0.0 for Kiosk
To find out what settings need to be excluded from CIS 3.0.0 for Multiple-App Kiosk need to work What CIS 3.0.0 settings are excluded from Single or Multi-App Kiosk? – Devicie Support Home.
Devicie will use our automation to push out the CIS 3.0.0 L1 + BL policies and Win32 app to your tenant.
The following will be covered in this article:
- Create Device Configuration: Assigned Access (Auto Logon)
- Deploy Win32 Apps as Required
- Create Enrolment Status Page (ESP)
- Create Device Configuration Profile: Power Management
- Create Device Configuration Profile: Configure Start Pins
- Create Kiosk Configuration Profile
Create Device Configuration: Assigned Access (Auto Logon)
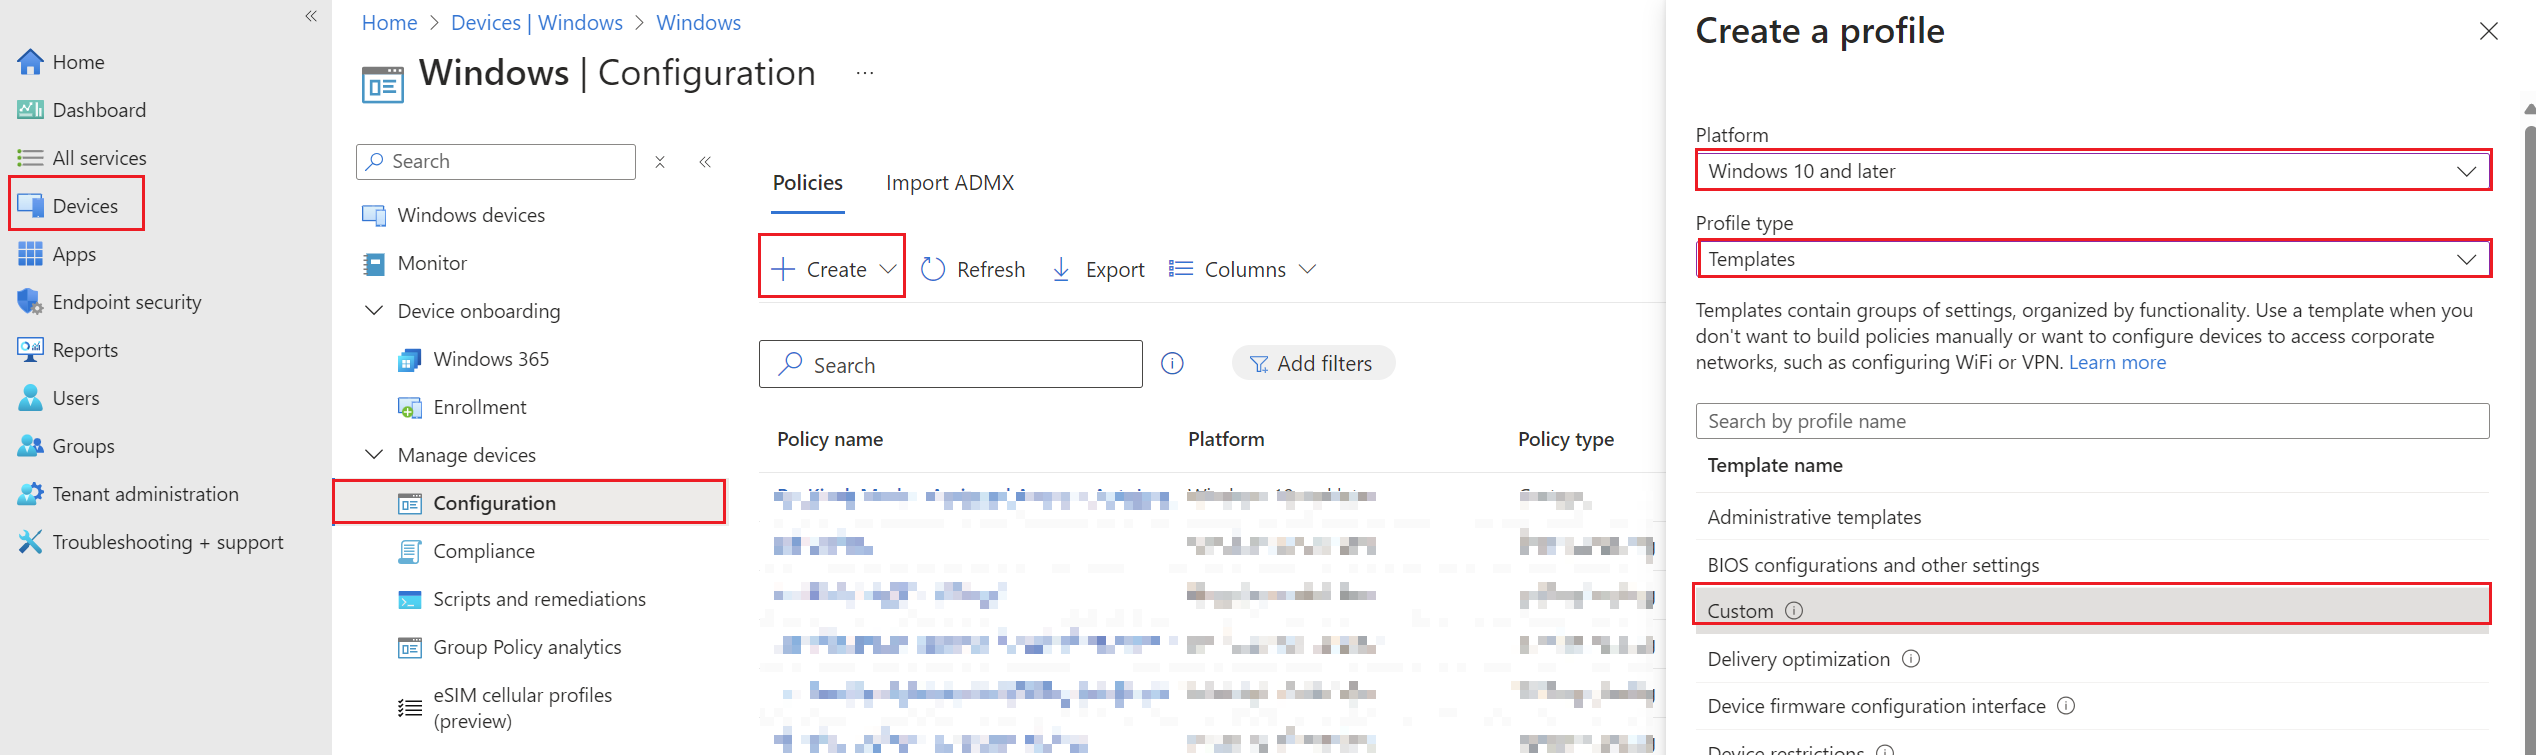
1. By navigating to Windows Configuration Profiles, select Create then select New Policy then select By platform: Windows 10 and later and Profile type: Templates then select Custom then select Create.
2. Under Basics tab, enter the following:
Name: Kiosk Mode - Assigned Access - Auto Logon
Description: Kiosk Mode - Assigned Access - Auto Logon
Then select Next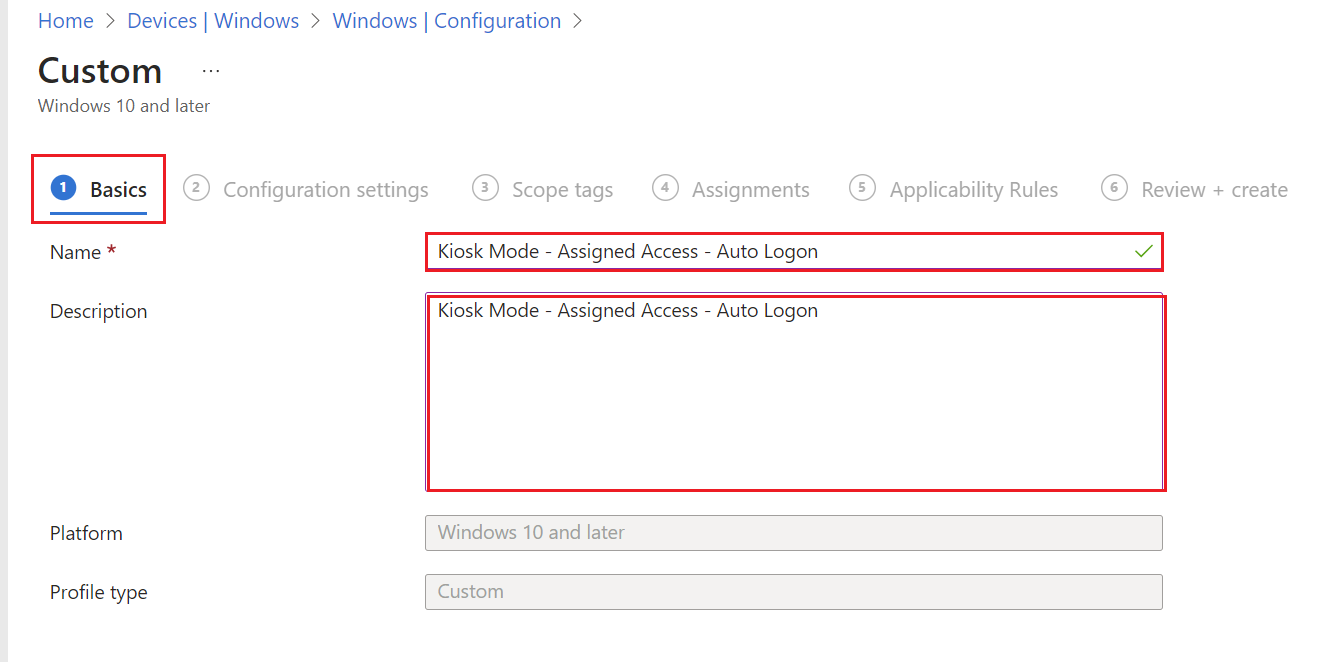
3. Under Configuration Settings tab, select Add Setting.
Note: In the XML, update it according to what name you desire for it to show.
<Config>
<AutoLogonAccount rs5:DisplayName="Kiosk" />
<DefaultProfile Id="{bceca31b-867e-4694-ad7d-cfc680019be3}" />
</Config>
The enter the following:
Name: AssignedAccess
Description: Not Configured
OMA-URI: ./Vendor/MSFT/AssignedAccess/Configuration
Data type: String (XML file)
Custom XML: Upload the XML
Save the following XML as Kiosk-Autologon-Kioskuser0.xml
<?xml version="1.0" encoding="utf-8" ?>
<AssignedAccessConfiguration
xmlns="http://schemas.microsoft.com/AssignedAccess/2017/config"
xmlns:win11="http://schemas.microsoft.com/AssignedAccess/2022/config"
xmlns:rs5="http://schemas.microsoft.com/AssignedAccess/201810/config">
<Profiles>
<Profile Id="{bceca31b-867e-4694-ad7d-cfc680019be3}">
<AllAppsList>
<AllowedApps>
<App DesktopAppPath="%ProgramFiles%\Mozilla Firefox\firefox.exe" />
<App DesktopAppPath="%ProgramFiles%\Google\Chrome\Application\chrome.exe" />
<App DesktopAppPath="%PROGRAMFILES(X86)%\Microsoft\Edge\Application\msedge.exe" />
</AllowedApps>
</AllAppsList>
<win11:StartPins>
<![CDATA[
{ "pinnedList":[
{"desktopAppLink":"%ProgramFiles%\\Mozilla Firefox\\firefox.exe"},
{"desktopAppLink":"%ProgramFiles%\\Google\\Chrome\\Application\\chrome.exe"},
{"desktopAppLink":"%PROGRAMFILES(X86)%\\Microsoft\\Edge\\Application\\msedge.exe"}
] }
]]>
</win11:StartPins>
<Taskbar ShowTaskbar="true"/>
</Profile>
</Profiles>
<Configs>
<Config>
<AutoLogonAccount rs5:DisplayName="Kiosk" />
<DefaultProfile Id="{bceca31b-867e-4694-ad7d-cfc680019be3}" />
</Config>
</Configs>
</AssignedAccessConfiguration>
It should look like this: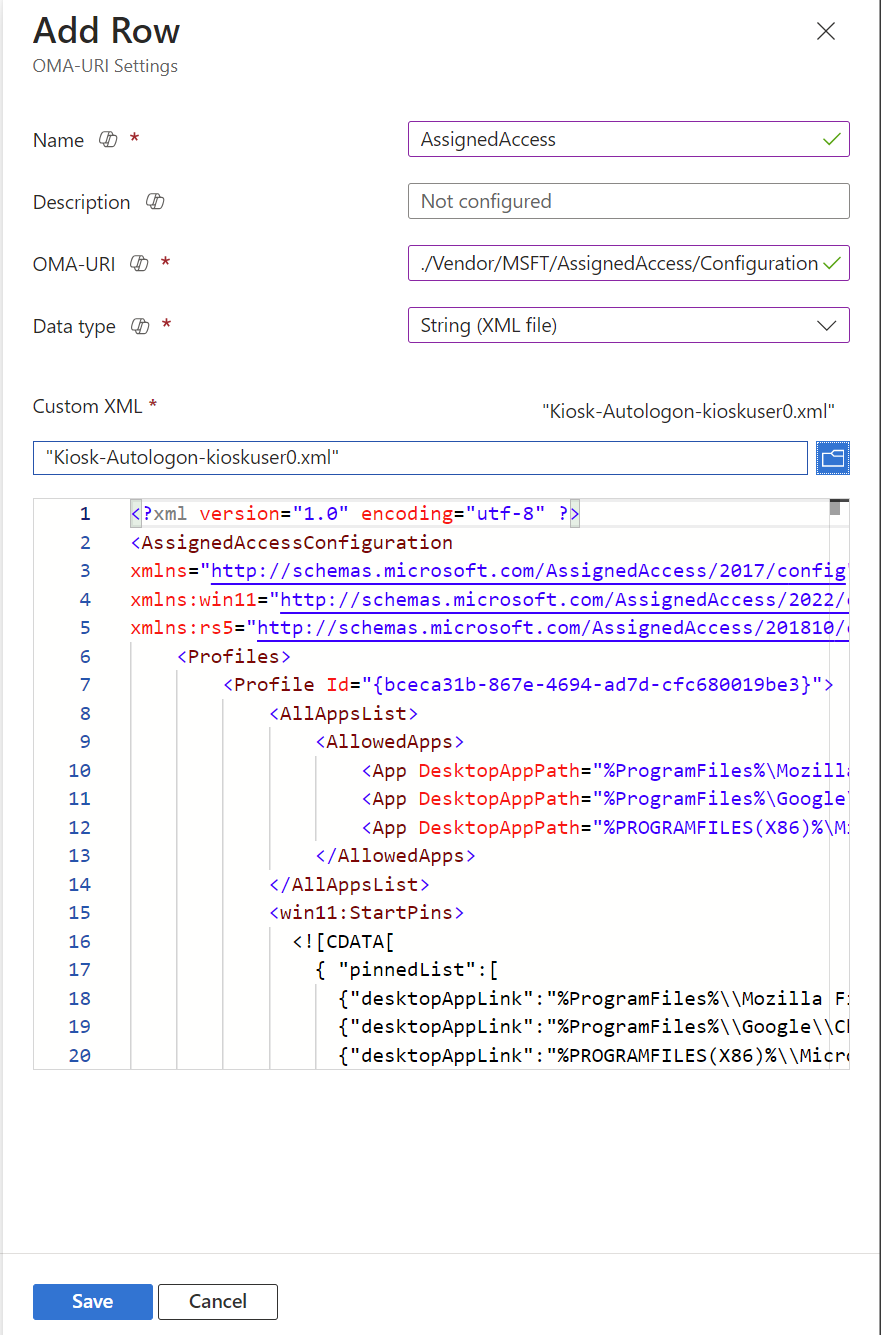
Select Save.
3. Under Scope tags, tab, leave as default and select Next.
4. Under Assignments, select the required group and select Next.
5. Under Applicability Rules, leave as default and select Next.
6. Under Review + create, review the settings then select Create.
Deploy Win32 Apps
The following applications will need to be deployed as required, similar group with the below Kiosk assignments.
1. By navigating to Microsoft Intune Windows apps, search for:
CIS Benchmark 3.0.0 Level 1 + BitLocker - Kiosk without DeviceLock
2. Assign the following applications as Required.
Create Enrolment Status Page (ESP)
1. By navigating to Enrollment Status Page, select Create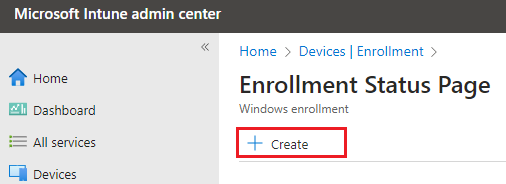
2. Under Basics, enter a name of the Enrolment Status Page like: ESP - Kiosk. Then select Next.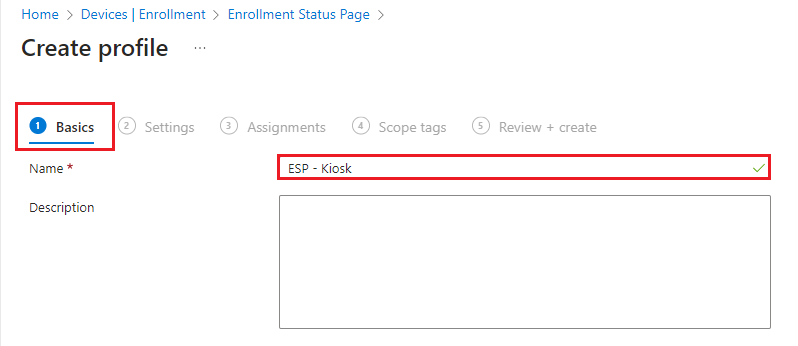
3. Under Settings, select Show app and profile configuration progress to Yes.
Select the other settings highlighted in red.
4. Under Block device use until required apps are installed if they are assigned to the user/device, click on Select apps, then choose the required.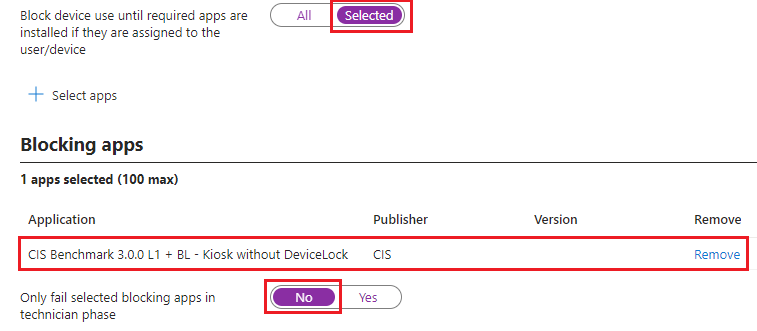
Note: Devicie will upload the Win32 App: CIS Benchmark 3.0.0 Level 1 + BitLocker - Kiosk to your tenant.
5. Under Assignments, select your desired Kiosk Group. Then select Next.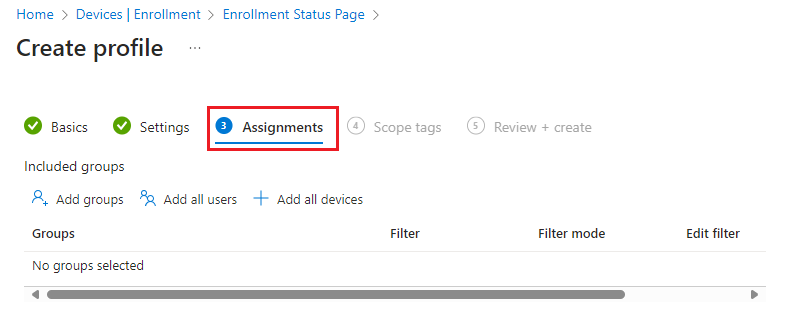
6. Under Scope tags, leave as default and select Next.
7. Under Review + create, review any settings and select Create.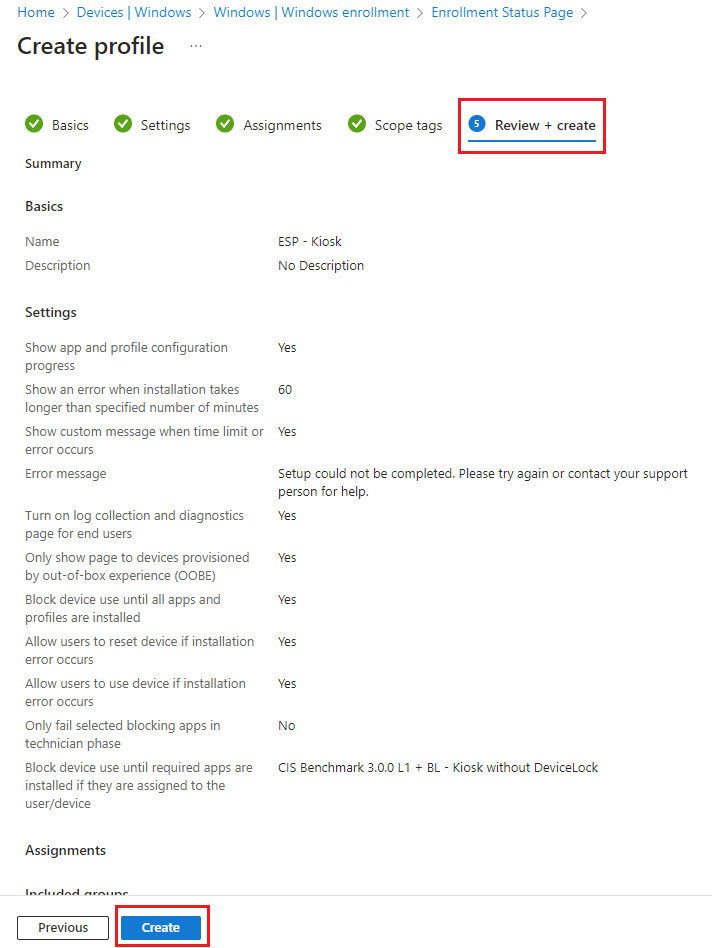
Create Windows Autopilot Deployment Profile
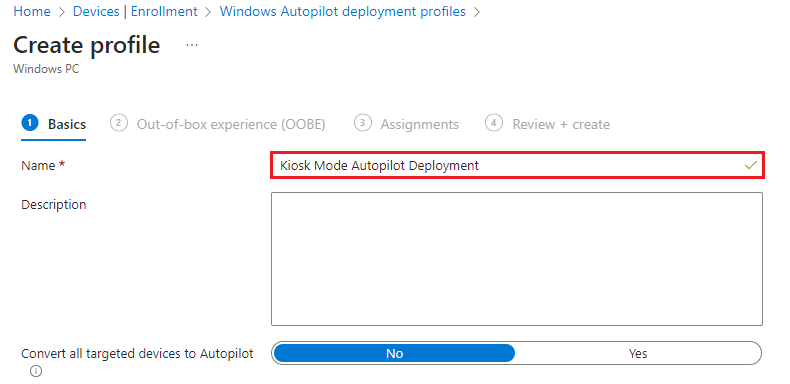
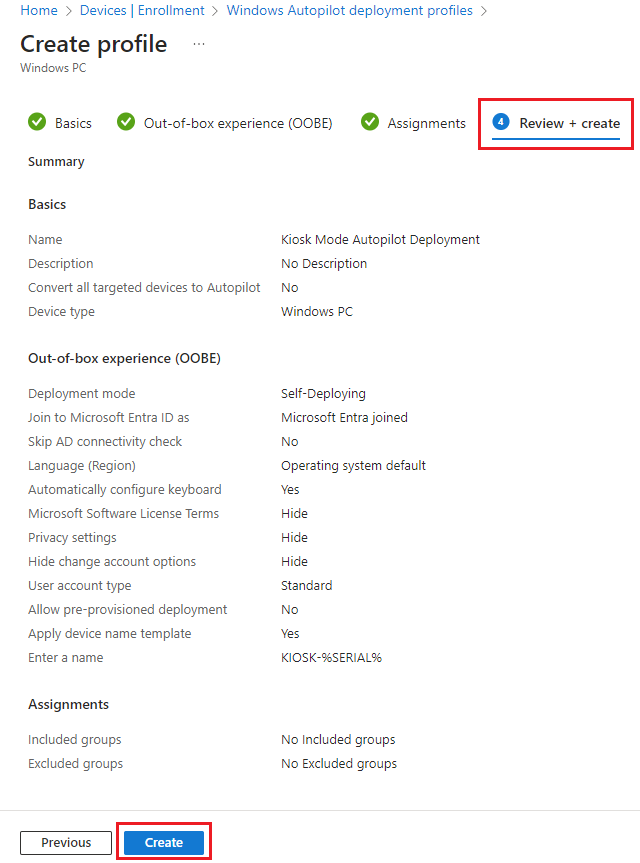
1. By navigating to Windows Autopilot Deployment profile, select Create Profile then select Windows PC. Then select Next.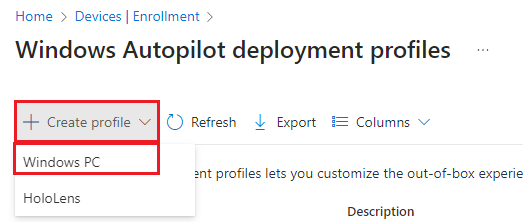
2. Under Basics, enter a name for the deployment profile. Then select Next.
3. Under Out-of-box experience (OOBE), configure the following:
Deployment mode: Self-deploying
Language (Region): Operating system default (Optional to change to English: Australia)
Automatically configure keyboard: Yes
Apply device name template: Yes
Enter a name: KIOSK-%SERIAL%
Then select Next.
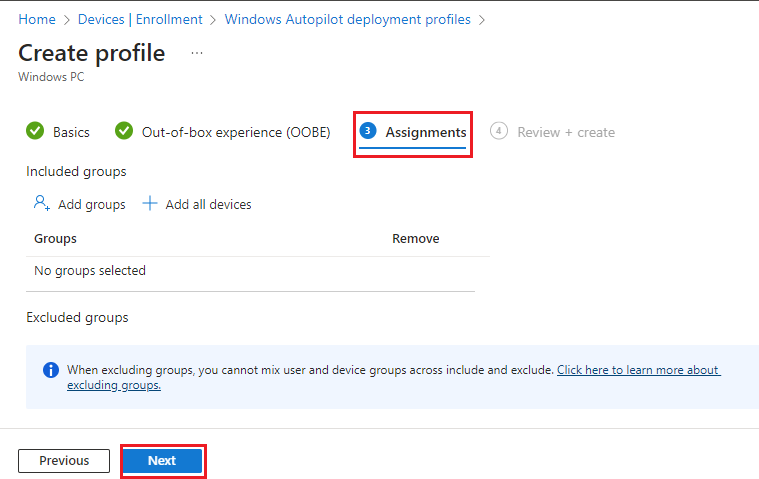
4. Under Assignments, select the required Kiosk assignment then select Next.
5. Under Review + Create, review the settings then select Create.
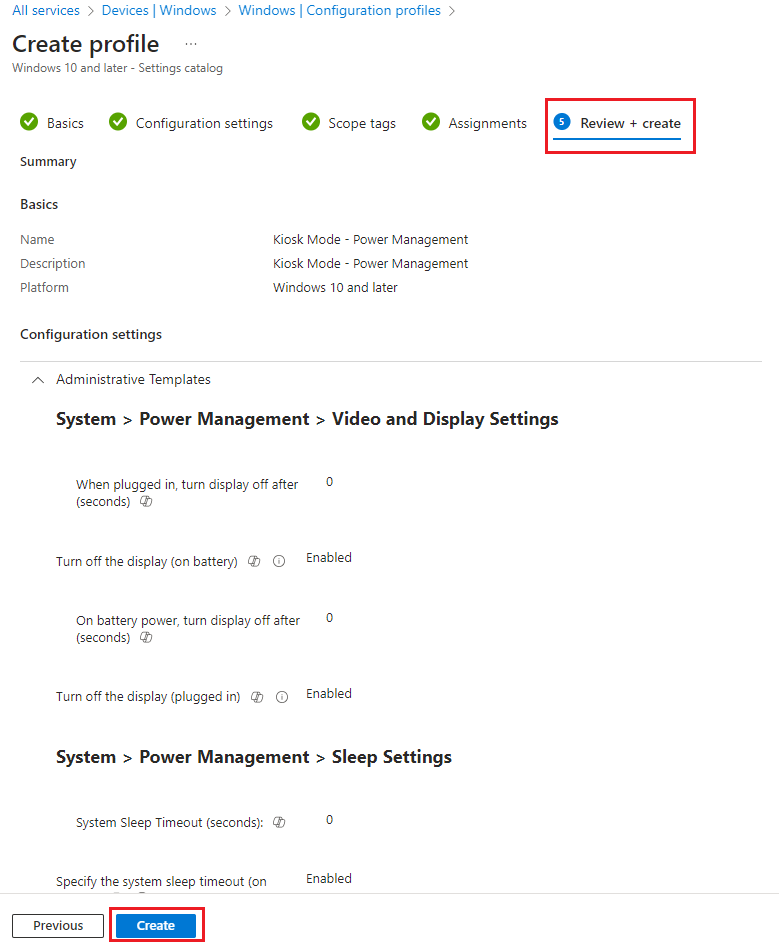
Create Device Configuration Profile
1. By navigating to Windows Configuration Profiles, select Create then select New Policy then select By platform: Windows 10 and later and Profile type: Settings Catalog then select Create.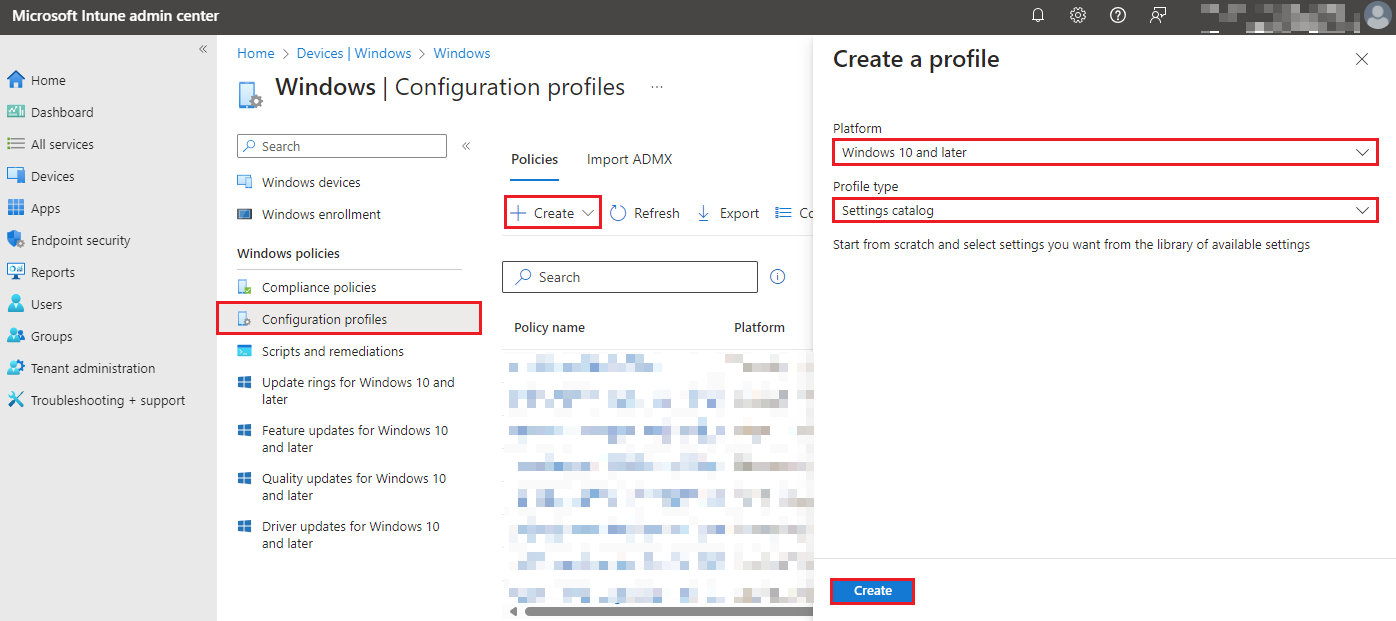
2. Under Basics tab, enter the following:
Name: Kiosk Mode - Power Management
Description: Kiosk Mode - Power Management
Then select Next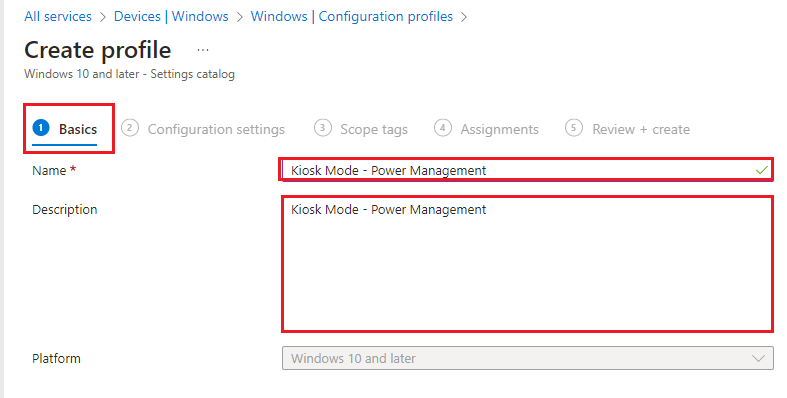
3. Under Configuration Settings tab, select Add Setting. In the search for a setting, enter in: Power Management.
Then select the following:
Administrative Templates\System\Power Management
Administrative Templates\System\Power Management\Hard Disk Settings
Administrative Templates\System\Power Management\Sleep Settings
Administrative Templates\System\Power Management\Video and Display Settings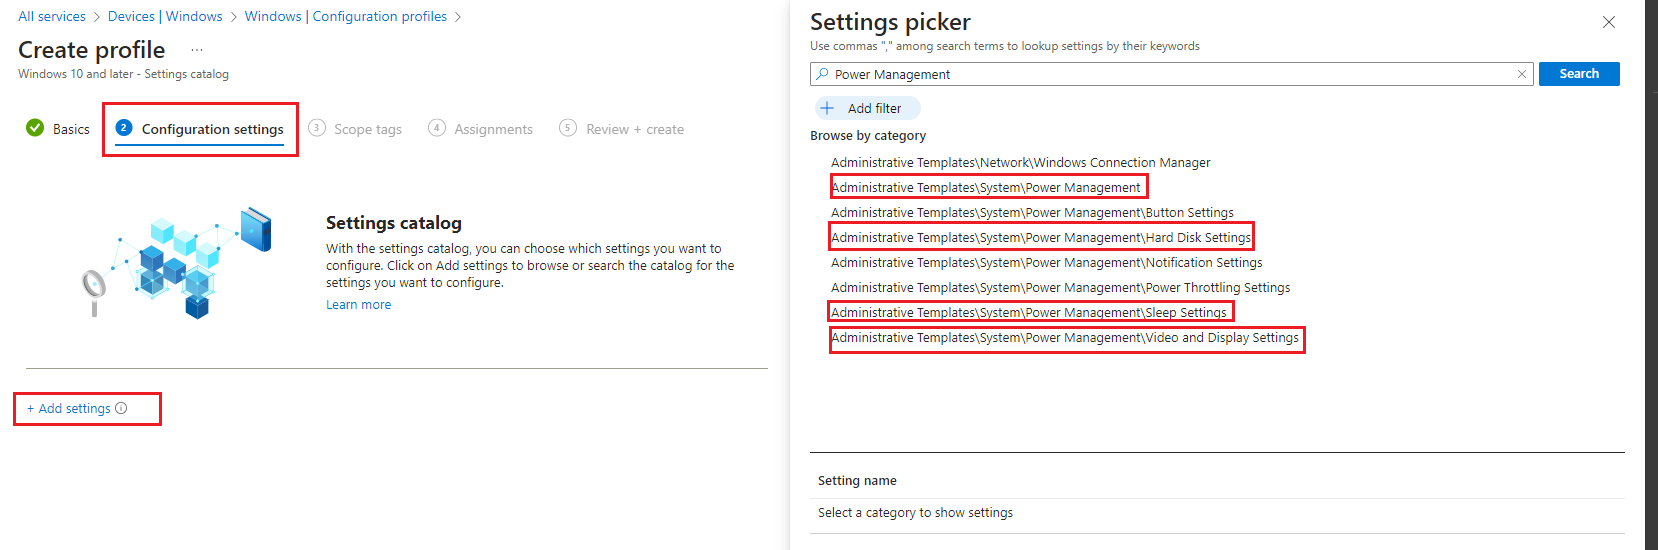
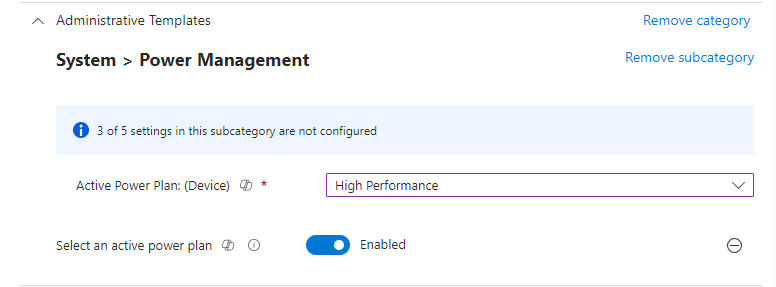
Under Administrative Templates\System\Power Management, select the following:
- Select an active power plan as Enabled
- Select Action Power Plan (Device): High Performance
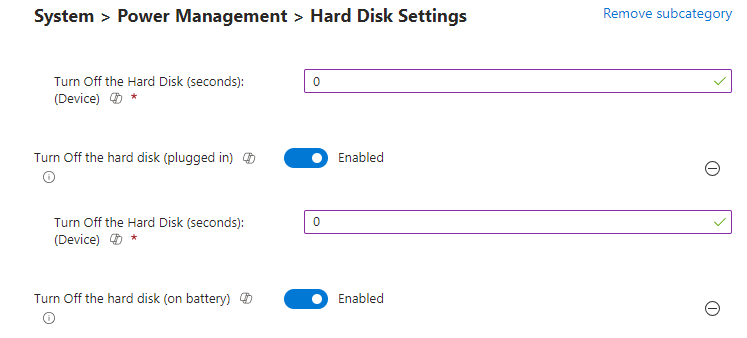
Under Administrative Templates\System\Power Management\Hard Disk Settings, select the following:
- Turn Off the hard disk (on battery) as Enabled
- Turn Off the Hard disk (seconds) Device: 0
- Turn Off the hard disk (plugged in) as Enabled
- Turn Off the Hard disk (seconds) Device: 0
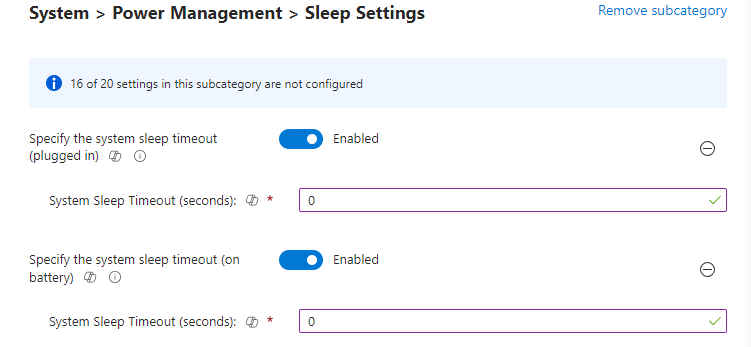
Under Administrative Templates\System\Power Management\Sleep Settings
- Specify the system sleep timeout (on battery) as Enabled
- System Sleep Timeout (seconds): 0
- Specify the system sleep timeout (plugged in) as Enabled
- System Sleep Timeout (seconds): 0
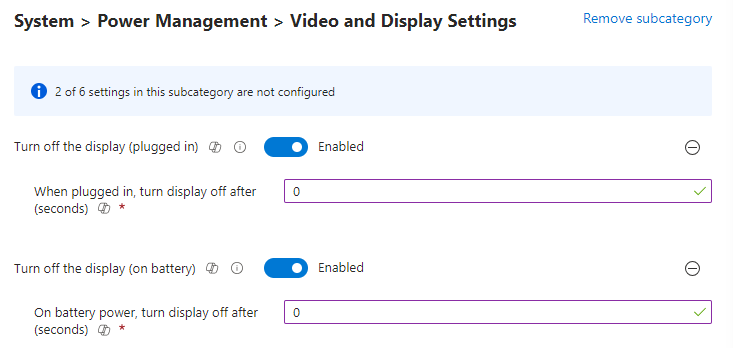
Under Administrative Templates\System\Power Management\Video and Display Settings, select the following:
- Turn off the display (on battery) as Enabled
- When plugged in, turn display off after (seconds): 0
- Turn off the display (plugged in) as Enabled
- On battery power, turn display off after (seconds): 0
Then select Next.
4. Under Scope tags, leave as default then select Next.
5. Under Assignments, select your required Kiosk group then select Next.
6. Under Review + create, review your settings then select Next.
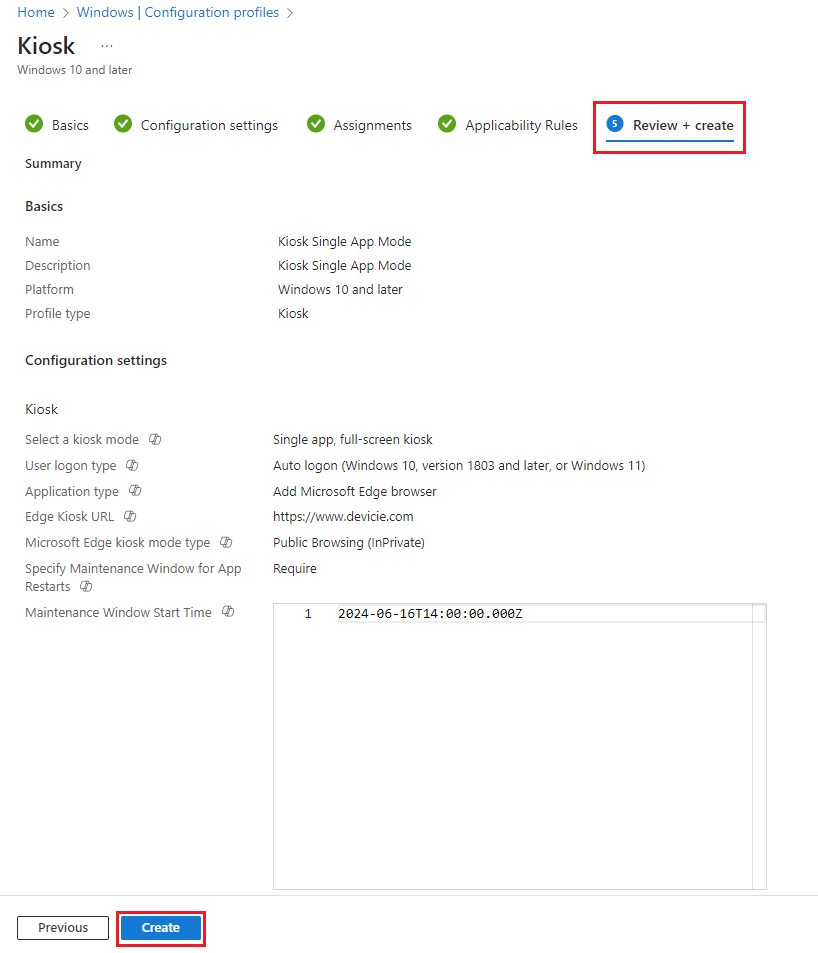
Create Kiosk Configuration Profile
By navigating to Windows Configuration Profiles, select Create then select New Policy then select By platform: Windows 10 and later and Profile type: Templates then select Kiosk then select Create.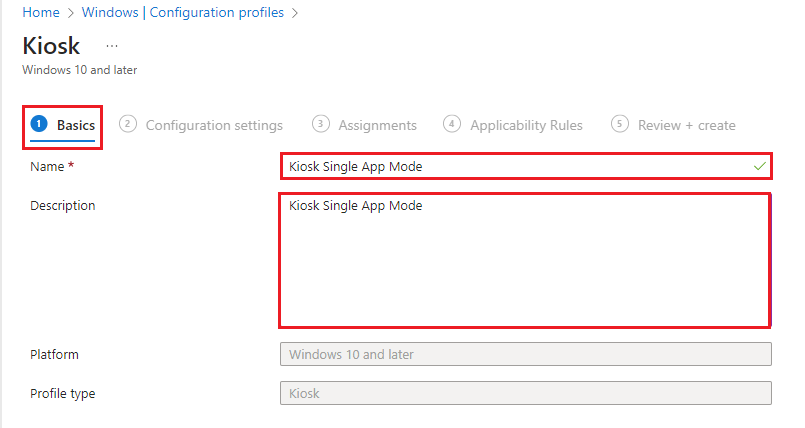
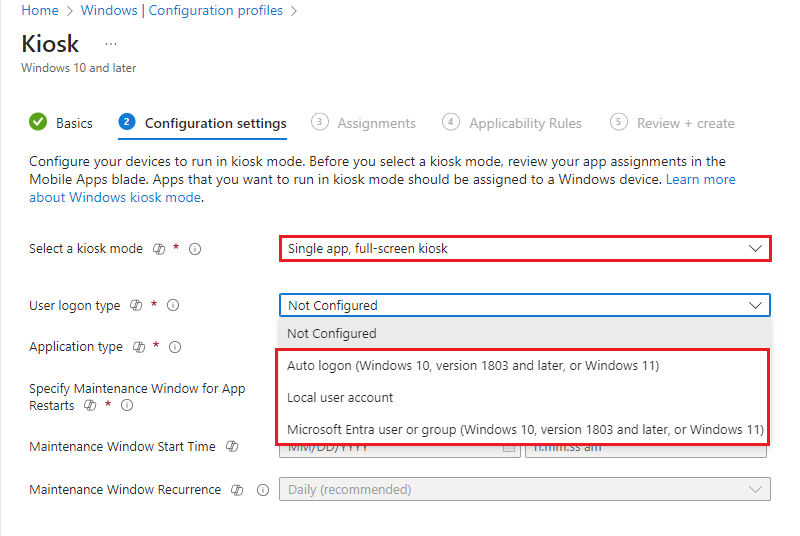
2. Under Configuration settings, select the following:
Select a kiosk mode: Single app, full-screen kiosk
User logon type: You will have the options to select Auto logon, Local user account or Microsoft Entra user or group. By following this article: How to create an Auto-login Admin Account on a workstation using Microsoft Intune – Devicie Support Home
The list of options when selecting User logon type:
For Auto logon (Windows 10, version 1803 and later or Windows 11):
- Application type:
- Add Microsoft Edge browser
- Add Microsoft Edge Legacy browser
- Add Kiosk browser
- Add Store app
For Local user account:
- User logon name: kioskuser0
- Application type:
- Add Microsoft Edge browser
- Add Microsoft Edge Legacy browser
- Add Kiosk browser
- Add Store app
For Microsoft Entra user or group (Windows 10 1803 and later or Windows 11 :
- User logon name: Microsoft Entra user or group
- Application type:
- Add Microsoft Edge browser
- Add Microsoft Edge Legacy browser
- Add Kiosk browser
- Add Store app
Under Browsers and Applications, you can select:
Add Kiosk Browser, make sure to use the "Microsoft Store app (new)" to deploy Kiosk Browser.
Then select Next.
3. Under Assignments, select the required assignments and select Next.
4. Under Applicability Rules, configured the required or leave as default and select Next.
5. Under Review + create, review the required and select Create.