By default, users are allowed to onboard personal devices to an Intune tenant. While users might not purposely enrol a device using the appropriate onboarding process of adding a work/school account, they may accidentally join the device to Intune and allow the organisation to manage it.
There are multiple ways to restrict this and we will cover the use cases for each scenario below.
End User Education
You may need to send communications out to your end users to guide them from accidentally joining the device to your Intune tenant. This is very useful in the initial onboarding process where you may want to allow users to onboard their company devices and you don't have a list of hardware hashes available to import to your Intune tenant.
Users will often use their personal devices to check emails, log in to Microsoft Edge to sync their bookmarks, or use any SaaS application that allows single sign in. In such instances, users will be prompted to sign it to their company account. We will take Microsoft Edge as an example in the below instructions, but the same principal applies across all Microsoft applications where a sign in may be required.
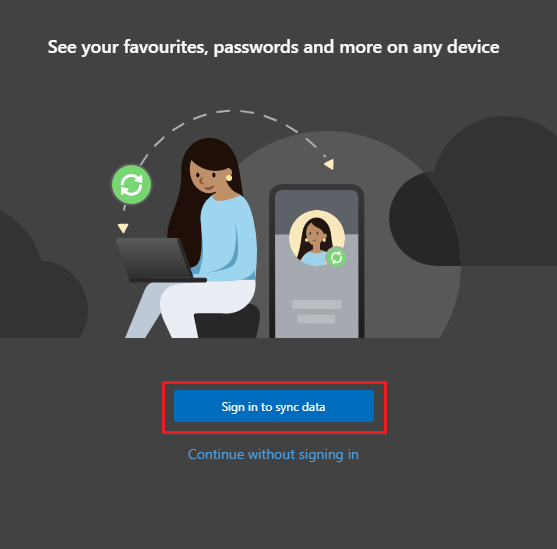
- A user opens Microsoft Edge and attempts to Sign in to sync data such as history, passwords, extensions, bookmarks, etc...
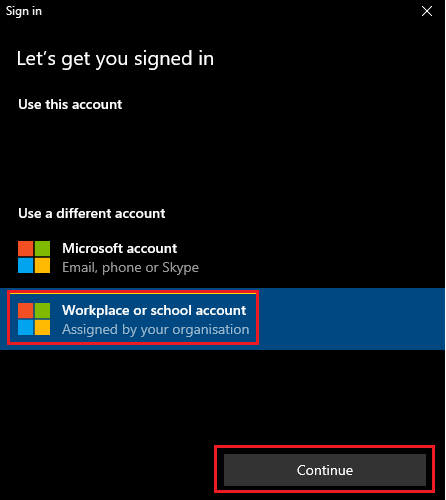
- The user selects to sign in using Workplace or school account and clicks on Continue.
- They type in their email, password and most likely MFA, and click Sign in. They will then receive a popup window asking them if they wish to "Stay signed in to all your apps". This is the part users usually get wrong and their personal device ends up being enrolled to your Intune tenant.
- In the below section, the user needs to untick the "Allow my organization to manage my device", then click on No, sign in to this app only. Users must not click the OK button.
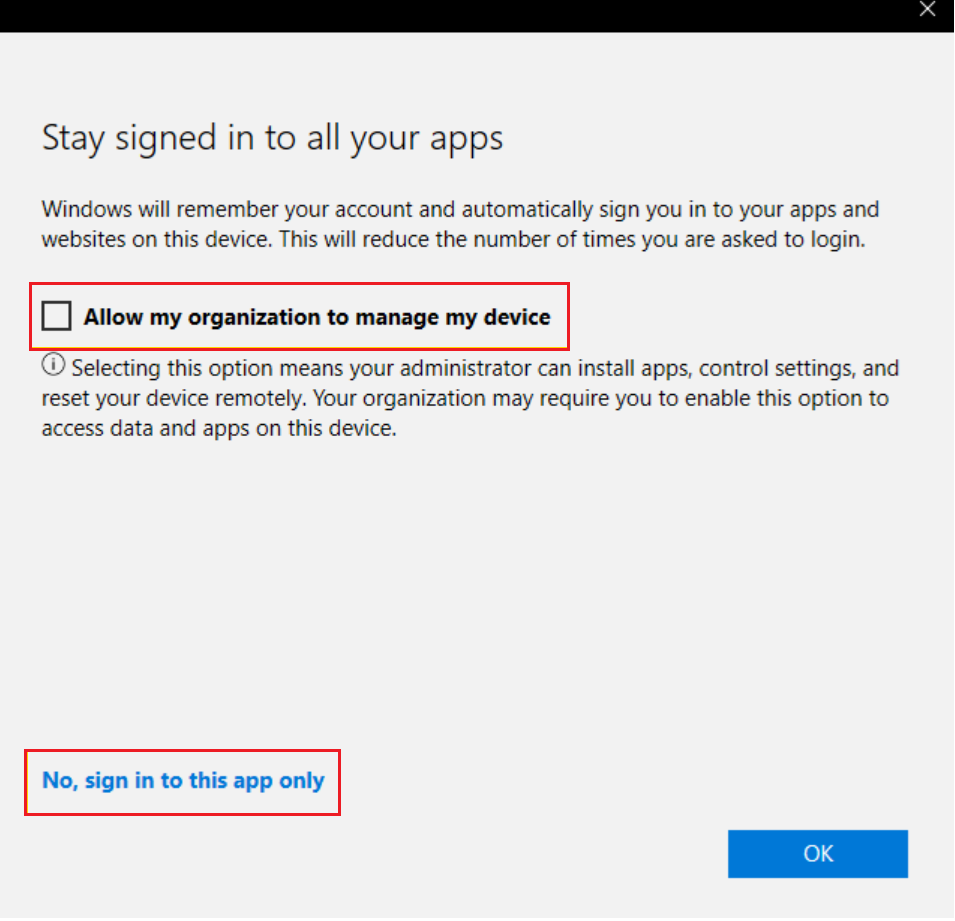
- This scenario will allow the user to use their company account to sign in to their personal devices without affecting the enrolment status of the device.
Note:
The organisation will not be able to manage or wipe this device.
Set Enrolment restrictions
Once the initial onboarding is complete and you now have a better idea regarding what devices you want to allow in your tenant in terms of device type, manufacturer, device hash IDs, OS type, etc... You can setup restrictions to better suit your organisation and users while reducing the margin for error from end users.
As an Intune administrator, you can create and manage enrolment restrictions that define what devices can enrol into management with Intune, including the:
- Number of devices.
- Operating systems and versions.
You can create multiple restrictions and apply them to different user groups. You can set the priority order for your different restrictions.
Note:
Enrolment restrictions are not security features. Compromised devices can misrepresent their character. These restrictions are a best-effort barrier for non-malicious users.
The specific enrolment restrictions that you can create include:
- Maximum number of enrolled devices.
- Device platforms that can enrol:
- Android device administrator
- Android Enterprise work profile
- iOS/iPadOS
- macOS
- Windows
- Platform operating system version for iOS/iPadOS, Android device administrator, Android Enterprise work profile, and Windows.
- Minimum version.
- Maximum version.
- Restrict personally owned devices (iOS, Android device administrator, Android Enterprise work profile, macOS, and Windows).
Default restrictions
Default restrictions are automatically provided for both device type and device limit enrolment restrictions. You can change the options for the defaults. Default restrictions apply to all user and userless enrolments. You can override these defaults by creating new restrictions with higher priorities.
Create a device platform restriction
-
Sign in to the Microsoft Intune portal > Devices > Enrollment restrictions > Create restriction > Device platform restriction.
-
On the Basics page, give the restriction a Name and optional Description.
-
Choose Next to go to the Platform settings page.
-
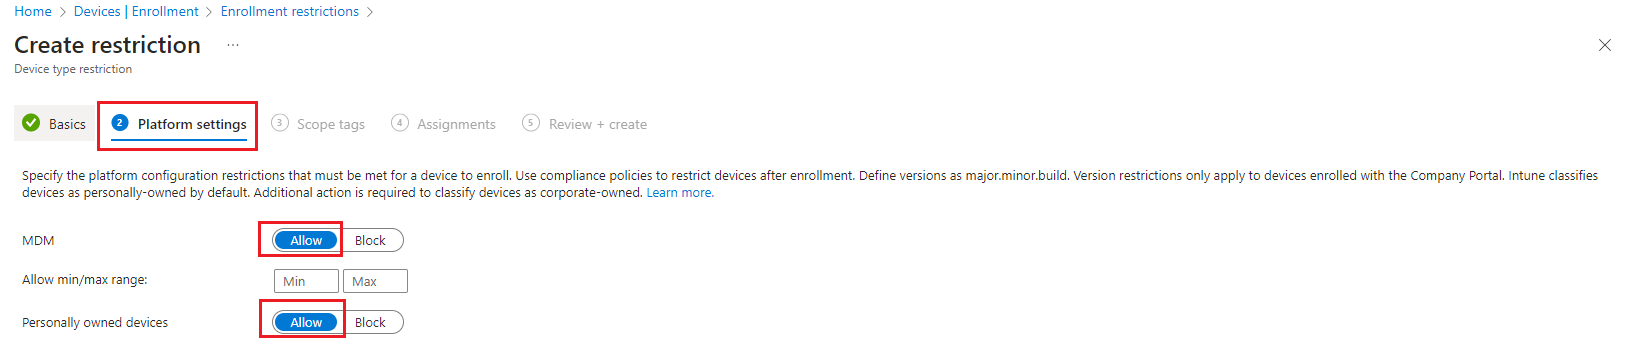
Under Platform, choose Allow for the platforms that you want this restriction to allow.
-
Under Versions, choose the minimum and maximum versions that you want the allowable platforms to support. For iOS and Android, version restrictions only apply to devices enrolled with the Company Portal. Supported version formats include:
- Android device administrator and Android Enterprise work profile support major.minor.rev.build.
- iOS/iPadOS supports major.minor.rev. Operating system versions don't apply to Apple devices that enroll with the Device Enrolment Program, Apple School Manager, or the Apple Configurator app.
- Windows supports major.minor.build.rev for Windows 10 only.
Important:
Android Enterprise work profile and Android device administrator platforms have the following behaviour:- If both platforms are allowed for the same group, then users will be enrolled with a work profile if their device supports it, otherwise they will enrol as device administrator.
- If both platforms are allowed for the group and refined for specific and non-overlapping versions, then users will receive the enrolment flow defined for their OS version.
- If both platforms are allowed, but blocked for the same versions, then users on devices with the blocked versions will be taken down the Android device administrator enrolment flow and then get blocked from enrolment and prompted to sign out.
Worth noting that neither work profile or device administrator enrolment will work unless the appropriate perquisites have been completed in Android Enrolment.
-
Under Personally owned, choose Allow for the platforms that you want to permit as personally owned devices.
-
Under Device manufacturer, enter a comma-separated list of the manufacturers that you want to block.
-
Choose Next to go to the Scope tags page.
-
On the Scope tags page, optionally add the scope tags you want to apply to this restriction. For more information about scope tags, see Use role-based access control and scope tags for distributed IT. When using scope tags with enrolment restrictions, users can only re-order policies for which they have scope. Also, they can only reorder for the policy positions for which they have scope. Users see the true policy priority number on each policy. A scoped user can tell the relative priority of their policies even if they can't see all the other policies.
-
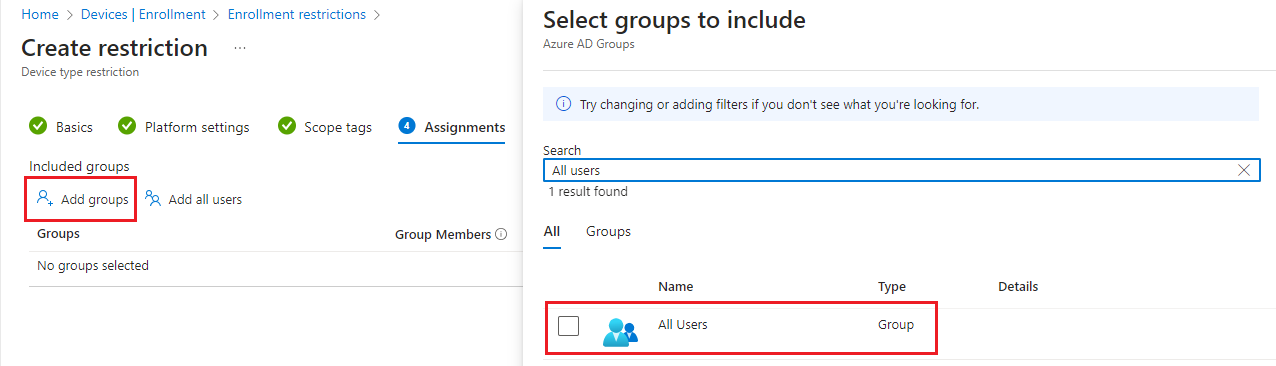
Choose Next to go to the Assignments page.
-
Choose Select groups to include and then use the search box to find groups that you want to include in this restriction. The restriction applies only to groups to which it's assigned. If you don't assign a restriction to at least one group, it won't have any effect. Then choose Select.
-
Select Next to go to the Review + create page.
-
Select Create to create the restriction.
-
The new restriction is created with a priority just above the default. You can change the priority.
Important:
Android Enterprise work profile and Android device administrator platforms have the following behaviour:
- If both platforms are allowed for the same group, then users will be enrolled with a work profile if their device supports it, otherwise they will enrol as device administrator.
- If both platforms are allowed for the group and refined for specific and non-overlapping versions, then users will receive the enrolment flow defined for their OS version.
- If both platforms are allowed, but blocked for the same versions, then users on devices with the blocked versions will be taken down the Android device administrator enrolment flow and then get blocked from enrolment and prompted to sign out.
Worth noting that neither work profile or device administrator enrolment will work unless the appropriate perquisites have been completed in Android Enrolment.
Create a device limit restriction
- Sign in to the Microsoft Intune portal > Devices > Enrollment > Device limit restriction > Create restriction.
- On the Basics page, give the restriction a Name and optional Description.
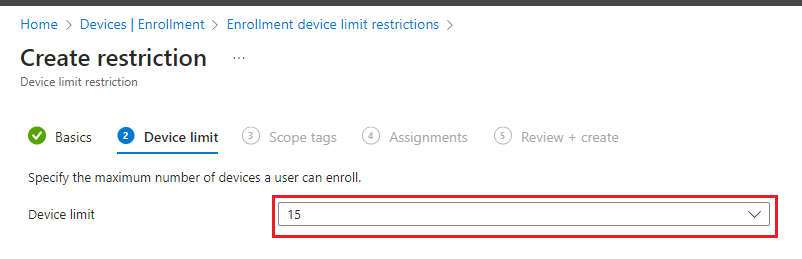
- Choose Next to go to the Device limit page.
- For Device limit, select the maximum number of devices that a user can enrol.
- Choose Next to go to the Scope tags page.
- On the Scope tags page, optionally add the scope tags you want to apply to this restriction. For more information about scope tags, see Use role-based access control and scope tags for distributed IT. When using scope tags with enrolment restrictions, users can only re-order policies for which they have scope. Also, they can only reorder for the policy positions for which they have scope. Users see the true policy priority number on each policy. A scoped user can tell the relative priority of their policies even if they can't see all the other policies.
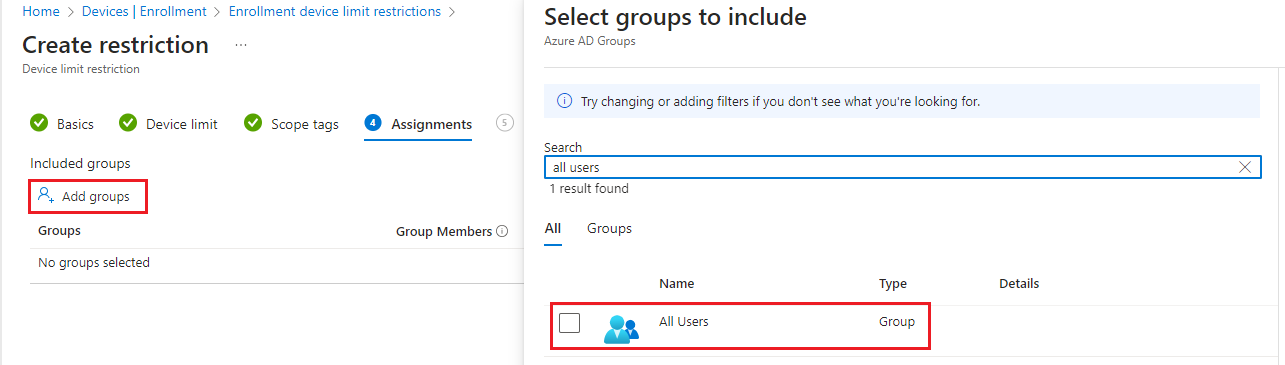
- Choose Next to go to the Assignments page.
- Choose Select groups to include and then use the search box to find groups that you want to include in this restriction. The restriction applies only to groups to which it's assigned. If you don't assign a restriction to at least one group, it won't have any effect. Then choose Select.
- Select Next to go to the Review + create page.
- Select Create to create the restriction.
- The new restriction is created with a priority just above the default. You can change the priority.
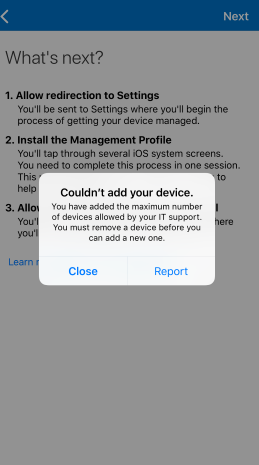
During BYOD enrolments, users see a notification that tells them when they've met their limit of enrolled devices. For example, on iOS:
Important:
Device limit restrictions don't apply for the following Windows enrolment types:
- Co-managed enrolments
- GPO enrolments
- Entra ID joined enrolments
- Bulk Entra ID joined enrolments
- Autopilot enrolments
- Device Enrolment Manager enrolments
Device limit restrictions are not enforced for these enrolment types because they're considered shared device scenarios. You can set hard limits for these enrolment types in Entra ID.
Change Enrolment restrictions
You can change the settings for an enrolment restriction by following the steps below. These restrictions don't effect devices that have already been enrolled.
- Sign in to the Microsoft Intune portal > Devices > Enrollment restrictions > choose the restriction that you want to change > Properties.
- Choose Edit next to the settings that you want to change.
- On the Edit page, make the changes that you want and proceed to the Review + save page, then choose Save.
Blocking personal Android devices
- If you block personally owned Android device administrator devices from enrolment, personally-owned Android Enterprise work profile devices can still enrol.
- By default, your Android Enterprise work profile devices settings are the same as your settings for your Android device administrator devices. After you change your Android Enterprise personally-owned work profile or your Android device administrator settings, that's no longer the case.
- If you block Android Enterprise personal work profile enrolment, only corporate-owned Android devices can enrol with Android Enterprise personally-owned work profiles.
Blocking personal Windows devices
If you block personally owned Windows devices from enrolment, Intune checks to make sure that each new Windows enrolment request has been authorized as a corporate enrolment. Unauthorized enrolments will be blocked.
The following methods qualify as being authorized as a Windows corporate enrolment:
- The enrolling user is using a device enrolment manager account.
- The device enrols through Windows Autopilot.
- The device is registered with Windows Autopilot but isn't an MDM enrolment only option from Windows Settings.
- The device enrols through a bulk provisioning package.
- The device enrols through GPO, or automatic enrolment from Configuration Manager for co-management.
The following enrolments are marked as corporate by Intune. But since they don't offer the Intune administrator per-device control, they'll be blocked:
- Automatic MDM enrolment with Microsoft Entra join during Windows setup*.
- Automatic MDM enrolment with Microsoft Entra join from Windows Settings*.
The following personal enrolment methods will also be blocked:
- Automatic MDM enrolment with Add Work Account from Windows Settings*.
- MDM enrolment only option from Windows Settings.
* These won't be blocked if registered with Autopilot.
Blocking personal iOS/iPadOS devices
By default, Intune classifies iOS/iPadOS devices as personally-owned. To be classified as corporate-owned, an iOS/iPadOS device must fulfil one of the following conditions:
- Registered with a serial number.
- Enrolled by using Automated Device Enrolment (formerly Device Enrolment Program)
Note:
An iOS User Enrolment profile overrides an enrolment restriction policy. For more information, see Set up iOS/iPadOS and iPadOS User Enrolment with Company Portal.
Change Enrolment Restriction Priority
Priority is used when a user exists in multiple groups that are assigned restrictions. Users are subject only to the highest priority restriction assigned to a group that they are in. For example, Joe is in group A assigned to priority 5 restrictions and also in group B assigned to priority 2 restrictions. Joe is subject only to the priority 2 restrictions.
When you create a restriction, it's added to the list just above the default.
Device enrolment includes default restrictions for both device type and device limit restrictions. These two restrictions apply to all users unless they're overridden by higher-priority restrictions.
Note:
Enrolment restrictions are applied to users. In enrolment scenarios that are not user-driven (e.g. Windows Autopilot self-deploying mode or white glove provisioning), only the Default priority restrictions (targeted to "All Users") will be enforced.
You can change the priority of any non-default restriction.
- Sign in to the Microsoft Entra portal.
- Select More Services, search for Intune, and then choose Intune.
- Select Device enrollment > Enrollment restrictions.
- Hover over the restriction in the priority list.
- Using the three vertical dots, drag the priority to the desired position in the list.